Senior Production
Post III
This week marked the end of an era, and the beginning of a new one. At the end of the week, moving into the early parts of the weekend, I reached a point in the tutorial I was following where I no longer needed to continue. Not because I had finished it (far from it, lots of cool polish related features were remaining), but I got to see enough of the engine and how to do things that I could leave the nest and fly on my own. Towards the later part of the weekend, during my untimely catching of a really nasty sickness and some of monday, I managed to scrunge together most of a prototype for one of our games, Balls Balls Revolution (BBR will be used from now on so I don’t have to keep typing it).
I mentioned BBR in my first blog post where I talked about some of our brainstorming ideas. If you want to go back and read it, the link is here: http://vincentloignon.com/blog/brainstorm/. If not, that’s fine, because i’m actually going to talk about it a bunch in this post and you can probably figure it out. I suppose this now makes “What did I get done?” the all important question. The short answer is a lot of important systems, but from the outside, it looks like a whole lot of nothing. Lets take a look at it a bit more in-depth to witness some of the neat things I got up and running.
3D
2D

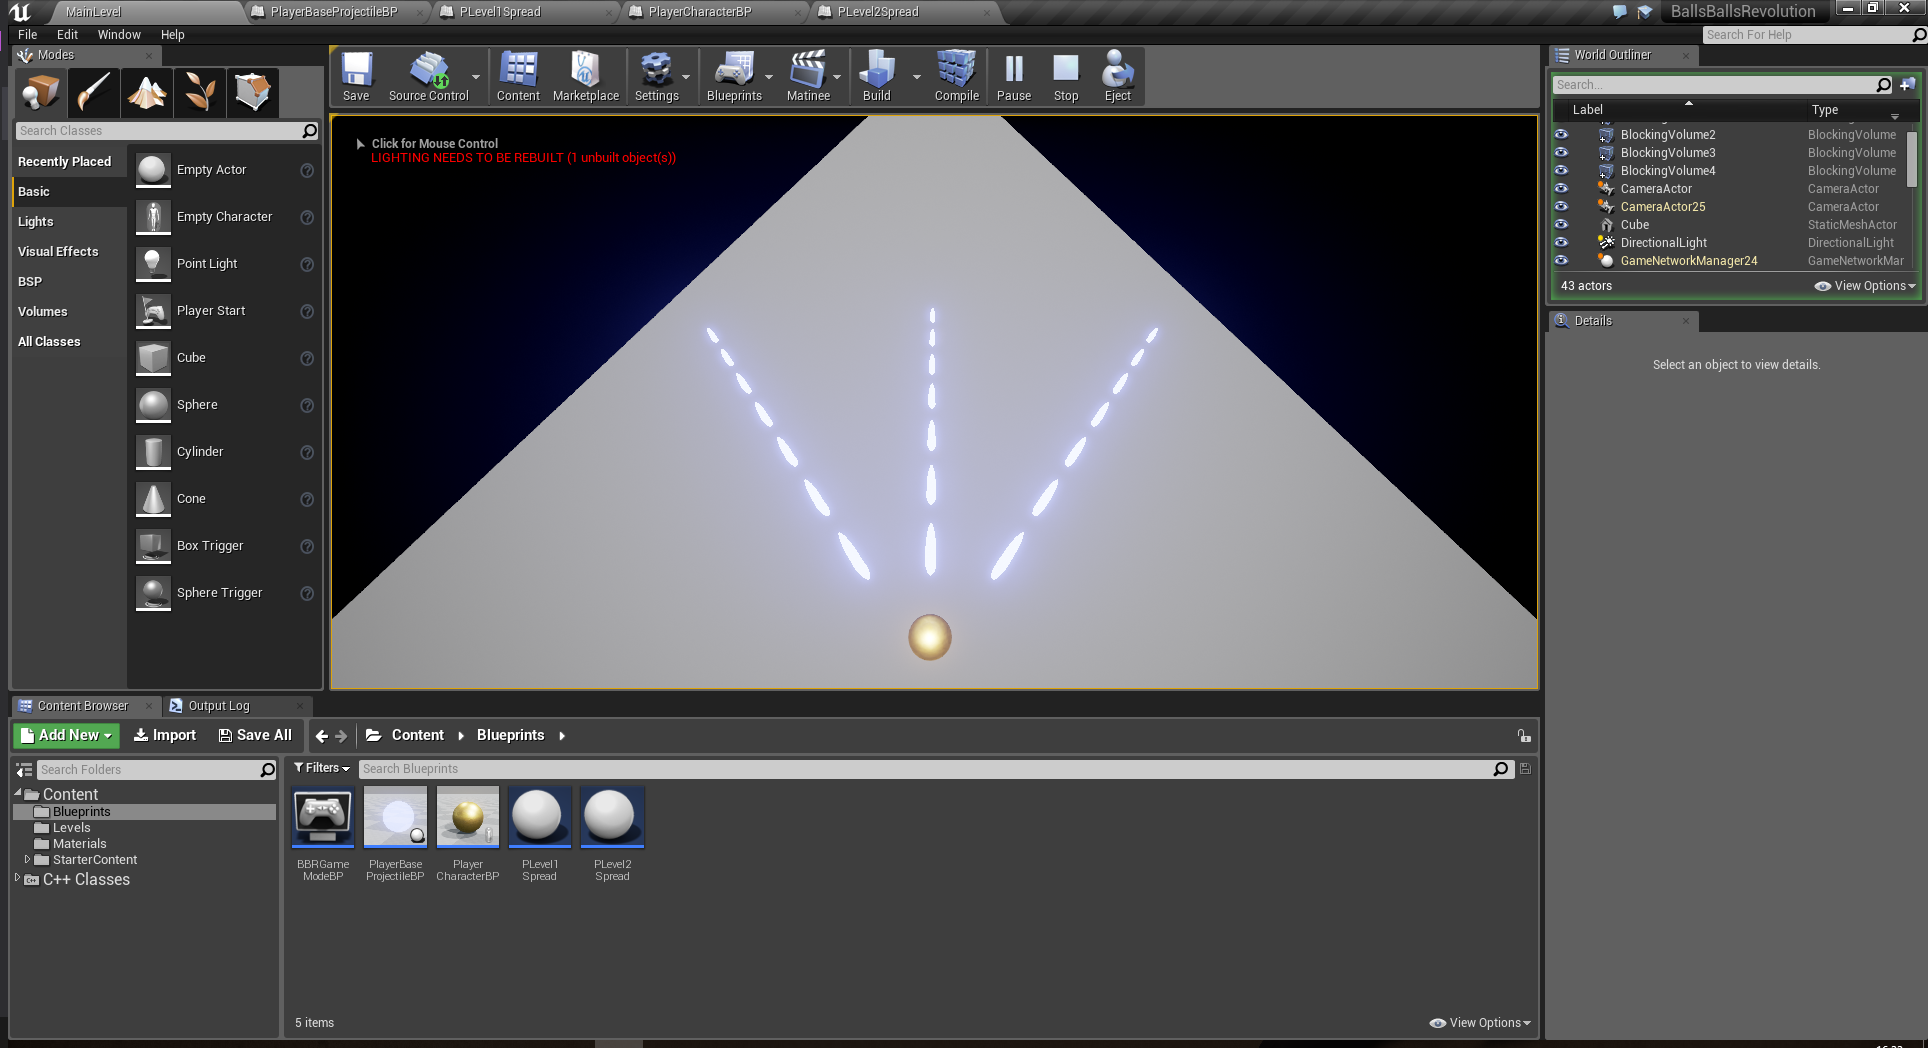
This is a graphic representation of some of the things that have been achieved. Now, It is important to note that you can’t see roughly 95% of the work I did from this, but lets break it down and see the insides.
The first thing to look at is the environment. The player (gold orb) is on a platform (the ugly grey thing). The camera is static and doesn’t move and in the 3D space, it is angled slightly so you can see ahead (hence the perspective warping on the ground). The player can move around the platform, but is blocked by invisible barriers I have placed so they cannot falloff and so they can only move so far up the platform (like most bullet hells tend to do). The player is also able to Dimension Hop between 2D and 3D. However, 2D is currently incomplete visually.
We also have another important system which is shooting. In fact, the shooting system has been built in a way is very easy to extend and create all sorts of bullet spreads and projectile types. These will be very important for building a bullet hell. Now, I tried to make a video to show this off because that would be the easiest way to do that. The biggest problem was that I kept coughing due to my recent sickness and my mic has horrible static, so i’ve opted for a picture heavy post this time. I am looking towards fixing my mic problem for the future so that I might be able to show some of these things in video form. I will explain it all first then just put all of the images in a gallery of sorts to look through should you wish to.
- The first step is to create your bullet spread. You can create a blueprint class and extend a class i’ve created in code called Bullet Spread. What this class does is when told to fire a projectile, it will search all of its sub-components and find all of the Arrow Components. These represent where to spawn the projectile and how to orient it in 3D space. It then creates a projectile of the type specified for each arrow. This means it is easy to create bullet spreads because its all visual in the editor and the system just handles everything else.
- The second step is to create your projectile. The projectile is slightly more complex, but is also very simple. You create a blueprint class, extending yet another class i’ve created in code called Projectile (big surprise). This class contains a mesh component, sphere collision component, and projectile movement component. The collision is separate from the mesh on purpose so you can customize them separately. The process is fairly simple, you import a mesh into the mesh component, tweak it as needed (materials and other settings). You can adjust your sphere collider to fit within your mesh as best you can or what will make sense in a game context. You then adjust the movement to work in the fashion you want. In my example, I turned off gravity, gave it a slight Y velocity (so it fires at a 45 degree angle to the arrow component) and give it a velocity. The nice thing is that you can also add other components and customize it to your liking and the base systems will still work.
- Lastly you go into the player’s blueprint and change which spread and projectile to use, in this case the ones you just created. Also make sure that you compiled everything before running! You can now run it and see your cool new spread and projectile in game!
- Profit!
[tribulant_slideshow gallery_id=”2″]
This brings my post for this week to an end, but there will be more in the coming weeks as I detail the progression of capstone from my eyes. Just keep in mind things I talk about may vary between things I’ve done and things my team has done.
TL;DR:
- Finished Tutorial
- Started BBR prototype
- Dimension Hopping!
- Bullet Spreads & Projectiles!
- You can make your own bullet spreads and projectiles easily!